Product Description
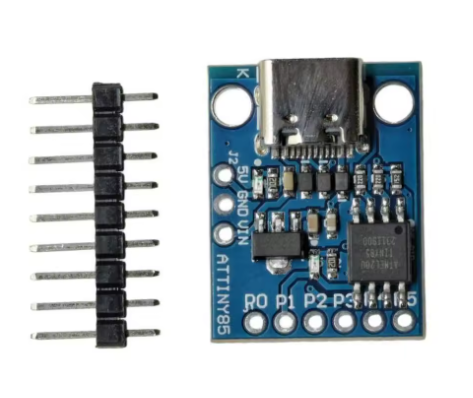
The ATtiny85 Mini Module with USB Type-C Interface is an ultra-compact, powerful development board designed for rapid prototyping and DIY electronics projects. This module utilizes the versatile ATtiny85 8-bit AVR microcontroller from Microchip, known for its small footprint yet robust capabilities.
The key feature of this specific board is the integration of a modern USB Type-C interface, which serves dual purposes: providing power and facilitating seamless programming via the Arduino IDE environment. This eliminates the need for bulky external programmers (like a standard ISP programmer), allowing users to connect the board directly to any modern computer or power source using a ubiquitous Type-C cable.
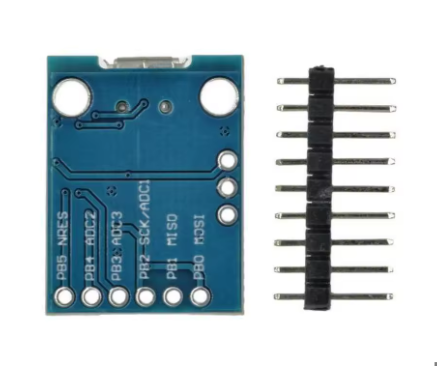
This board provides access to all essential GPIO pins of the ATtiny85, supporting digital input/output, PWM, ADC (Analog-to-Digital Conversion), and various communication protocols (I2C, SPI). Its small size and simple operation make it an excellent alternative to larger boards like the Arduino Uno for projects where space, power consumption, and simplicity are paramount. It’s perfect for creating small gadgets, sensor interfaces, LED controllers, and embedded systems prototypes.
Features
- Microcontroller: ATtiny85 (8-bit AVR processor with 8KB Flash Memory).
- Modern USB Type-C Interface: Used for both power supply and programming the module directly from a computer.
- Arduino IDE Compatibility: Fully programmable via the Arduino IDE using the MicroTiny or similar board definitions.
- Integrated Bootloader: Pre-flashed with a bootloader (like Micronucleus) to enable programming over USB without an external programmer.
- GPIO Access: Provides access to several I/O pins capable of PWM, ADC, I2C, and SPI functionality.
- Compact Footprint: Extremely small form factor suitable for embedded and wearable electronics projects.
- Status LED: An onboard LED (often connected to Pin 1) provides visual feedback for debugging and status indication.
- Onboard Voltage Regulator: Ensures stable operation when powered via the USB Type-C port.
Usage
The ATtiny85 module simplifies project development with its direct USB connectivity.
Programming Instructions
- Install Board Definitions: Within the Arduino IDE, add the URL for ATtiny board definitions to the Preferences and install the “attiny” package via the Boards Manager.
- Select Board: Select “ATtiny25/45/85” and configure the settings (e.g., “ATtiny85”, “8 MHz (internal)”).
- Connect: Plug the module into your computer using a USB Type-C cable.
- Upload Sketch: When prompted by the IDE to plug in the device to upload, press the upload button and then physically plug the board into the USB port. The bootloader will run for a few seconds to accept the new code.
Application Scenarios
- Small LED Effects: Driving LED strips or single LEDs with complex light patterns.
- Simple Sensor Interfaces: Reading data from basic analog or digital sensors where a full Arduino is overkill.
- Custom USB HID Devices: Creating simple custom keyboards or mouse input devices (using the DigiKeyboard library).
- Wearable Electronics: Its small size is perfect for integrating into clothing or accessories.
- Prototyping & Education: Ideal for teaching basic microcontroller programming in a cost-effective, compact format.
Q: Do I need an external programmer to use this board?
No. The module comes pre-flashed with a USB bootloader (like Micronucleus) which allows you to program it directly over the USB Type-C connection using the Arduino IDE.
Q: How many GPIO pins are available for my projects?
There are 6 usable I/O pins. Note that two of these pins are shared by the USB communication during programming, but they can be used as standard I/O pins once your program is running and the board is powered externally or after the bootloader times out.
Q: Can I power this module using a power bank?
Yes, you can power the module using any standard 5V USB source, including a power bank, a phone charger, or a computer USB port.
Q: Is it compatible with Arduino shields or standard headers?
No, due to its mini size, it uses individual header pins designed to be plugged into a breadboard. It does not have the standard Arduino form factor or shield compatibility.
Q: What is the operating frequency of the chip?
It typically runs at an internal 8MHz clock speed by default when programmed via the Arduino IDE bootloader configuration. This can be configured to run at 16MHz using specific settings and crystal modifications, but 8MHz is standard.