Description
The Photodiode Relay Control Board is a precision light-activated switching module designed for automation systems requiring reliable, threshold-based control of electrical loads. Unlike basic LDR-based modules that respond broadly to ambient light, this module utilizes a photodiode sensor that offers superior directionality and faster response times, making it ideal for applications where precise light detection from a specific direction is required.
The module operates on a 12V DC power supply and integrates a high-quality electromagnetic relay capable of switching loads up to 10A at 250V AC or 30V DC — sufficient for most industrial and residential applications including lighting systems, ventilation fans, pumps, and security equipment.
At the heart of the module is an LM393 comparator that processes the photodiode signal against an adjustable threshold set by the onboard blue potentiometer. This design provides clean, jitter-free switching without the need for a microcontroller. The module features both red power indicator and blue relay status LEDs, four 3mm mounting holes for secure installation, and screw terminal blocks for reliable load connections.
The photodiode sensor offers distinct advantages over traditional photoresistors: it responds primarily to light from a specific direction (narrow detection angle), is less affected by ambient light from the sides, and provides faster switching speeds. This makes the module particularly suitable for automotive lighting control, industrial automation, security systems, solar tracking, and any application where precise, directional light detection is required.
This module works in standalone mode — simply connect 12V power and your load, adjust the sensitivity threshold, and the module automatically switches your load based on ambient light levels. No programming or microcontroller is required for basic operation.
Features
-
Photodiode sensor — superior directionality and faster response compared to LDR sensors
-
12V DC operation — compatible with automotive, marine, solar, and industrial 12V systems
-
10A relay output — SPDT contacts rated for 250V AC or 30V DC loads
-
Adjustable light threshold — onboard blue potentiometer for precise sensitivity setting
-
LM393 comparator — provides clean, stable switching without jitter
-
Dual LED indicators — red for power, blue for relay status
-
Standalone operation — no microcontroller required for basic light-activated switching
-
Four mounting holes (3mm) — easy panel or enclosure installation
-
Screw terminal blocks — secure wiring for power and loads
-
Compact form factor — approx. 50mm × 26mm × 19mm
Technical Parameters
Usage Guide
1. Understanding the Photodiode Advantage
Unlike a photoresistor (LDR) which detects light from a wide angle (approximately 60–90 degrees), the photodiode on this module has a narrower detection angle and responds primarily to light coming from directly in front of the sensor. This makes it ideal for applications where you want to detect light from a specific direction (e.g., sunlight from a window, a vehicle headlight, or a specific light source) while ignoring ambient light from the sides.
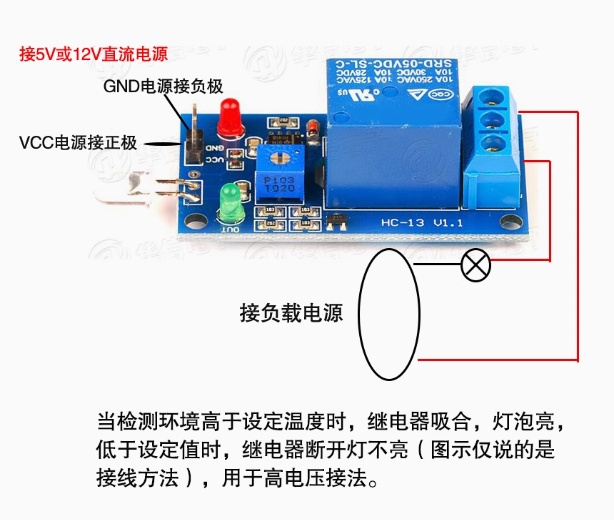
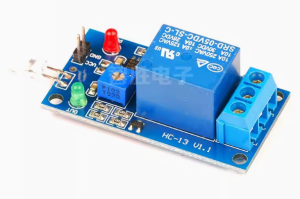
2. Wiring Instructions
3. Understanding Relay Operation
Typical configurations:
-
Load ON when light detected (e.g., automatic light that turns on in bright conditions): Connect load between COM and NO
-
Load OFF when light detected (e.g., night light that turns off during the day): Connect load between COM and NC
4. Sensitivity Adjustment
The blue potentiometer sets the light intensity threshold at which the relay changes state:
Adjustment tip: Expose the photodiode to the light level at which you want switching to occur. Slowly turn the potentiometer until the relay clicks (or the blue LED changes state). Fine-tune by moving between light and dark conditions.
5. Standalone Operation (No Microcontroller Required)
The module works entirely on its own with just a 12V power supply:
-
Connect 12V and GND to a 12V battery, 12V wall adapter, or industrial 12V power supply
-
Connect your load (lamp, fan, alarm, solenoid, etc.) to the relay terminals (COM and NO or NC)
-
Adjust sensitivity with the potentiometer
-
When the photodiode detects light above the threshold, the relay automatically switches
No programming — truly plug-and-play!
6. Automotive Application Example (Automatic Headlight Control)
To control vehicle headlights or daytime running lights based on ambient light:
12V Vehicle Battery (+) ──→ COM (Relay)
Headlight Relay Coil (+) ──→ NO (Relay)
Headlight Relay Coil (-) ──→ Chassis Ground
Module VCC ──→ 12V Vehicle Battery (+)
Module GND ──→ Chassis Ground
Photodiode Position ──→ Mount on dashboard or near windshield, pointing outward
Note: For direct headlight control (without an external relay), ensure your headlights draw less than 10A total.
7. Industrial Automation Example (Light Curtain / Beam Detection)
For detecting a light beam interruption (e.g., conveyor belt counting or safety application):
12V Industrial Power Supply (+) ──→ COM (Relay)
Alarm / Counter Input ──→ NO (Relay)
Alarm / Counter GND ──→ Power Supply GND
Module VCC ──→ 12V Power Supply (+)
Module GND ──→ Power Supply GND
Photodiode Position ──→ Pointing at a fixed light source (e.g., LED beam)
Result: When the light beam is broken (light level drops below threshold), the relay changes state, triggering your alarm or counter.
8. AC Load Wiring Example
The module can switch 110V/220V AC loads while being powered by 12V DC:
AC Live (110V/220V) ──→ COM (Relay)
AC Load Live (Lamp, Fan, etc.) ──→ NO (Relay)
AC Neutral ──→ Load Neutral (direct)
Module VCC ──→ 12V DC Power Supply
Module GND ──→ 12V DC Power Supply GND
⚠️ Safety Warning: The module uses 12V DC power, but the relay contacts can switch dangerous AC voltages. Always disconnect AC power before wiring, use proper insulation, and mount the module in an enclosure.
9. Using With a Microcontroller (Optional)
The module provides a digital output (often labeled DO or OUT) that can be connected to a microcontroller for additional logic.
Important: The digital output is typically 12V. Do NOT connect directly to a 5V or 3.3V microcontroller pin without a voltage divider or level shifter.
Recommended interface method: Use the relay output as an isolated switch input to your microcontroller (the relay contacts are completely isolated and can be treated as a simple switch).
10. Important Notes
-
Directionality: The photodiode is directional — point it directly at the light source you want to detect for best results.
-
Power supply: Use a regulated 12V DC power supply or a stable 12V battery. The module accepts 10V–14V range.
-
Response time: Photodiode response is faster than LDR-based modules — typically milliseconds.
-
Reverse polarity: Most versions do not have reverse polarity protection. Double-check wiring before applying power.
Q: What is the difference between a photodiode and an LDR (photoresistor)?
This module’s photodiode is ideal when you need to detect light from a specific direction (e.g., sunlight from a window, a vehicle headlight, or a targeted beam) while ignoring ambient light from the sides.
Q: Does this module need a microcontroller to work?
No. The module works in standalone mode with just a 12V power supply. When light intensity crosses the adjustable threshold, the relay automatically switches. This makes it perfect for simple light-activated switching applications without any programming.
Q: How do I set the light threshold?
Adjust the blue potentiometer on the board:
-
Apply 12V power to the module
-
Expose the photodiode to the light level at which you want switching to occur
-
Slowly turn the potentiometer until the relay clicks (or the blue LED changes state)
-
Fine-tune by moving between light and dark conditions
Q: What loads can I control with this module?
The relay contacts are rated for 10A at 250V AC or 10A at 30V DC — sufficient for most common loads:
For inductive loads (motors, pumps, solenoids), we recommend derating to ≤5A or adding external protection (flyback diode for DC, snubber for AC).
Q: Why choose a photodiode over an LDR for my application?
Choose this photodiode module if you need:
-
Directional detection — detecting light from a specific source (e.g., sunlight through a window, a headlight, or a targeted beam)
-
Fast response — applications requiring quick switching when light appears/disappears
-
Narrow field of view — ignoring ambient light from the sides
Choose an LDR-based module if you need:
-
Wide-area ambient light detection (e.g., dusk-to-dawn lighting)
-
Lower cost (LDR modules are typically less expensive)
Q: Can I use this module in a vehicle (12V automotive system)?
Yes, the module is designed for 12V systems (10V–14V range). For automotive use:
-
The module will tolerate typical charging voltage up to ~14.5V
-
For protection against load dump spikes, we recommend adding a 16V or 18V TVS diode across VCC and GND
-
Mount the photodiode where it can detect the desired light (e.g., on dashboard for ambient light detection)
-
Ensure the photodiode is not pointed directly at headlights (unless that is your intention)
Q: Can I use this module with a 24V system (truck, bus, industrial)?
No, not directly. The module is designed for 12V nominal (10V–14V). For 24V systems:
Do NOT connect the module directly to 24V — it will be permanently damaged.
Q: What is the detection angle of the photodiode?
The photodiode has a narrow detection angle (typically 10-30 degrees half-angle). This means it primarily detects light coming from directly in front of the sensor. For best results, point the photodiode directly at the light source you want to detect.
Q: Why is my module triggering randomly or not triggering at all?
Random triggering:
-
Photodiode may be detecting unintended light sources — check what it is pointing at
-
Sensitivity may be too high — turn potentiometer clockwise to reduce sensitivity
-
Electrical noise — add a 1000µF / 25V capacitor across VCC and GND
No triggering:
-
Check power — measure 12V across VCC and GND (red LED should be lit)
-
Turn potentiometer fully counter-clockwise (maximum sensitivity)
-
Shine a bright light directly into the photodiode — relay should activate
-
Check load wiring — if relay clicks but load doesn’t work, verify COM/NO/NC connections