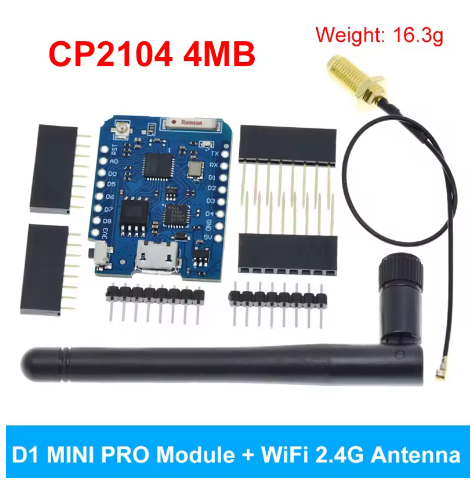
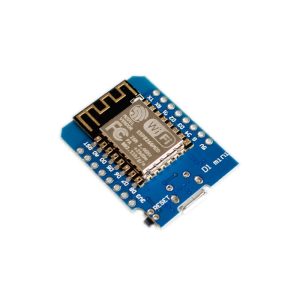
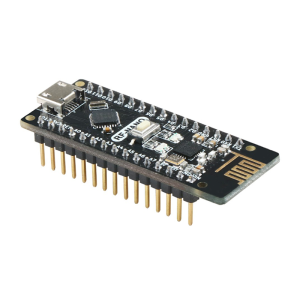
The mini D1 PRO NodeMCU Lua WiFi development board is a compact, ESP8266-based microcontroller with a micro-USB interface and external antenna connector, and is widely available from various online electronics retailers.
Specifications and Features
The mini D1 PRO is a popular choice for Internet of Things (IoT) projects due to its compact size and integrated Wi-Fi capabilities.
| Feature |
Details |
| Microcontroller |
ESP-8266EX |
| Operating Voltage |
3.3V (5V power is converted from MicroUSB) |
| Digital I/O Pins |
11 (all support interrupt/PWM/IIC/one-wire, except D0) |
| Analog Input Pins |
1 (max 3.2V input) |
| Clock Speed |
80MHz/160MHz |
| Flash Memory |
4MB or 16MB options available |
| Connectivity |
Wi-Fi (802.11 b/g/n) |
| USB Interface |
Micro-USB (uses CP2104 or CH340G chip depending on variant) |
| Antenna |
Built-in ceramic antenna and external U.FL antenna connector |
| Programming |
Programmable with Arduino IDE, NodeMCU (Lua), or MicroPython |
| Dimensions |
Approx. 34.2mm x 26.2mm |
User & Expert Opinions
- The board is widely praised for its compact size and rich feature set, making it a versatile choice for IoT projects.
- Reviewers on platforms like PMD Way highlight its great value and the availability of a larger 32MB (16MB actual) flash memory option, which is more than the usual 4MB found on the standard D1 Mini.
- The inclusion of both a built-in ceramic antenna and an external U.FL antenna connector is a key advantage of the Pro version, offering enhanced Wi-Fi transmission distances compared to the standard D1 Mini which only has a PCB antenna.
- According to a review from monohelixlabs.com, the WeMos D1 mini PRO is a great low-cost option for adding Wi-Fi connectivity to projects, typically priced around $5 (USD) from the official WEMOS store on AliExpress.
- Users note the convenience of the micro-USB connection for both power and data transfer, simplifying the development process.
- One point of note is that the Pro version may require a different driver (CP2104) than the standard version (CH340G), which users should be aware of during setup.
The mini D1 PRO NodeMCU Lua WiFi development board is a compact, ESP8266-based microcontroller with a micro-USB interface and external antenna connector, widely used for Internet of Things (IoT) projects.
Applications and Usage
The D1 Mini Pro is highly versatile due to its integrated Wi-Fi capabilities and compatibility with various shields and programming environments.
- Home Automation: Control lights, appliances, and security systems wirelessly using web interfaces or smartphone apps.
- Wireless Sensor Networks: Create networks for environmental monitoring, data collection (e.g., temperature, humidity, air quality) and logging data to a cloud service.
- Remote Monitoring: Monitor water usage, freezer temperatures, or salt levels in a water softener tank using various connected sensors.
- Smart Lighting: Control addressable LED strips (like WS2812B) with custom web interfaces for dynamic lighting effects.
- Robotics and Automation: Integrate into robotic projects for wireless control and monitoring.
- Prototyping: Rapidly develop and test concepts for connected electronic devices.
Q: What programming languages and IDEs are compatible with the board?
The D1 Mini Pro is compatible with the Arduino IDE and can be programmed using C/C++, NodeMCU (Lua scripting), or MicroPython.
Q: Do I need special drivers to connect it to my computer?
Yes, you may need to install the drivers for the onboard USB-to-UART converter chip. The Pro version typically uses the CP2104 chip, while other variants might use the CH340G. You can find drivers on the Silicon Labs website.
Q: How do I switch between the built-in and external antenna?
There is a small 0 ohm resistor (jumper) on the board situated between the chip antenna and the U.FL connector. To use the external antenna, you must move this resistor to the position connecting the output path from the IC to the U.FL connector.
Q: What is the maximum input voltage?
You can power the board via the micro-USB port with 5V, which is then converted internally to 3.3V. The 3.3V pin should receive 2.5V to 3.6V directly. The 5V pin can accept 3V to 7V.
Q: Can I use the D0 pin for general I/O?
The D0 pin (GPIO16) has specific functions. It is high at boot and is often used to wake the board from deep sleep mode. All other digital I/O pins (D1-D8, except for I/O pins involved in flash/serial communication) support interrupt/PWM/IIC/one-wire functionalities.
Q: How do I troubleshoot Wi-Fi connection issues?
Ensure your code is handling the Wi-Fi connection properly, especially if operating in both Station (STA) and Access Point (AP) modes simultaneously. Calling WiFi.waitForConnectResult() can help diagnose connection status. Incorrect boot pin voltages can also prevent proper operation.