Product Overview
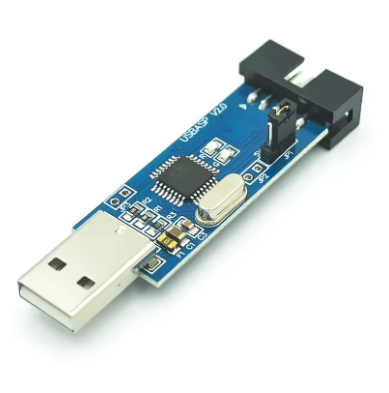
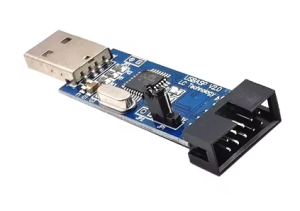
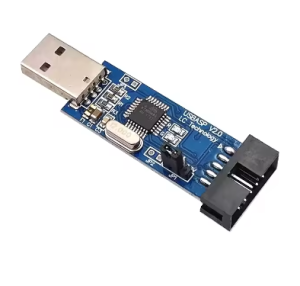
The USBASP USBISP 51 AVR Programmer Downloader is a professional-grade in-system programmer designed for 51 and AVR series microcontrollers. Based on the open-source USBASP project, this programmer connects to your computer via a standard USB port and uses the ISP (In-System Programming) protocol to flash firmware, erase chips, and configure fuse bits without removing the target microcontroller from its circuit .
Whether you are developing embedded systems, working on Arduino projects (burning bootloaders), or programming AT89S51/52 or AVR chips like ATmega and ATtiny series, this programmer delivers fast, stable, and reliable performance . With an adjustable ISP programming speed of up to 8MHz, it supports both 5V and 3.3V target systems .
Equipped with a 500mA self-recovery fuse, this programmer protects your computer’s USB port from accidental short circuits on the target board . The 180° straight cable design allows for easy connection to development boards and is particularly compatible with standard vertical ISP header layouts on many target boards. The onboard power and programming status LEDs provide real-time visual feedback during operation .
Key Features
-
USB 2.0 Full-Speed Interface: 12Mbps communication speed for fast program uploads, compatible with USB 1.1 and 2.0 .
-
Broad Microcontroller Support: Programs 51 series (AT89S51, AT89S52, etc.) and all AVR ISP chips (ATmega, ATtiny series) .
-
Adjustable ISP Speed: Auto-speed control firmware automatically tracks the target chip’s frequency (supports up to 8MHz programming clock) .
-
Dual Voltage Compatibility: Supports both 5V and 3.3V target board logic levels, selectable via jumper on compatible versions .
-
Onboard ATmega8A Controller: Built around the reliable ATmega8A or ATmega88 microcontroller with pre-programmed USBasp firmware .
-
500mA Overcurrent Protection: Built-in self-recovery resettable fuse protects both the programmer and your computer’s USB port from short circuits .
-
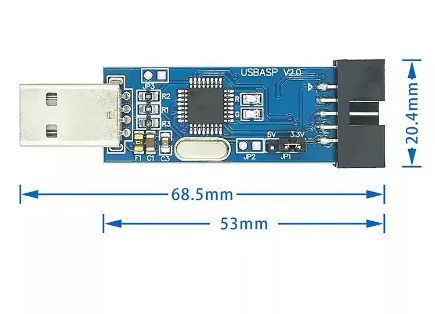
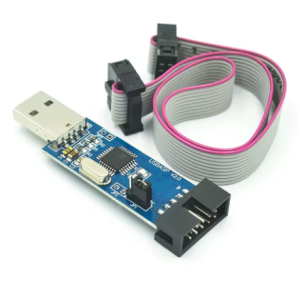
Standard 10-Pin ISP Interface: 2×5 pin ISP connector for connection to target boards, with a 180° straight cable design for vertical header access .
-
Reserved 6-Pin Header: Convenient 6-pin (MOSI, MISO, SCK, RESET, VCC, GND) interface for easy connection to target boards as needed .
-
Self-Upgradable Firmware: The programmer can be updated to support future devices via the reserved programming interface .
-
Cross-Platform Compatibility: Works with Windows (XP through 11), Linux, and macOS. Supported by ProgISP, AVR_Fighter, AVRDUDE, AVRStudio, and Arduino IDE .
Technical Specifications
Pinout & Interface Guide
The programmer uses a standard 10-pin IDC (2×5) ISP connector. Pinout assignments may vary slightly depending on the specific USBASP version:
Reserved 6-Pin Interface (for direct connection):
Supported Microcontrollers
51 Series (Commonly Supported):
AT89S51, AT89S52, AT89S53, AT89S8253, AT89S2051, AT89S8252, AT89S4051 .
AVR Series (Commonly Supported):
-
ATmega Series: ATmega48, ATmega8, ATmega16, ATmega32, ATmega64, ATmega88, ATmega128, ATmega162, ATmega168, ATmega164, ATmega324, ATmega328, ATmega644, ATmega640, ATmega1280, ATmega1281, ATmega2560, ATmega2561, ATmega8515, ATmega8535 and more .
-
ATtiny Series: ATtiny12, ATtiny13, ATtiny24, ATtiny25, ATtiny44, ATtiny45, ATtiny84, ATtiny85, ATtiny2313, ATtiny861 and more .
-
Other AVR: AT90S, AT90CAN series .
(This list is not exhaustive; the programmer supports most AVR devices with ISP interface.)
Usage Guide
Driver Installation
Windows 10/11:
-
You may need to temporarily disable Driver Signature Enforcement .
-
Use Zadig tool to install the libusb-win32 driver for USBASP .
-
The device will appear as “USBasp” under Atmel USB Devices .
Windows XP/7/8:
-
Download the libusb-win32 driver package.
-
Run the inf-wizard to generate and install the driver for “USBasp” .
macOS / Linux:
Most modern distributions have built-in support; no additional driver installation is typically required .
Wiring Instructions
-
Connect the Programmer: Plug the USB cable (180° straight connector) into the programmer board and into your computer’s USB port.
-
Connect to Target Board: Use the 10-pin IDC cable to connect the programmer to your target microcontroller board’s ISP header.
-
Ensure correct pin alignment (Pin 1 on programmer to Pin 1 on target board).
-
For boards with 6-pin ISP header, use the reserved 6-pin interface or jumper wires.
-
Essential connections: MOSI, MISO, SCK, RESET, VCC, GND .
Using ProgISP / AVR_Fighter Software
-
Start the Software: Launch ProgISP or AVR_Fighter .
-
Select Programmer: Choose USBASP as the programmer and USB as the interface .
-
Select Chip: Click the chip dropdown menu and select your target microcontroller model (e.g., AT89S52 or ATMEGA16) .
-
Set Fuse Bits (AVR only): For 51 series MCUs, this step is not required . For AVR chips:
-
Load Flash File: Click Load Flash and select your compiled .hex or .bin firmware file .
-
Program: Click Auto or Program to write the firmware to the chip .
Using AVRDUDE (Command Line)
AVRDUDE is a powerful cross-platform command-line utility for programming AVR chips.
Basic command structure:
avrdude -c usbasp -p m16 -U flash:w:main.hex
-
-c usbasp: Selects the USBASP programmer .
-
-p m16: Specifies the target chip (e.g., ATmega16) .
-
-U flash:w:main.hex: Writes main.hex to the flash memory.
Programming Steps for 51 Series (e.g., AT89S52)
-
Connect programmer to target board via ISP interface.
-
Open ProgISP and select USBASP .
-
Select chip: AT89S52 from dropdown .
-
No fuse setting required for 51 series .
-
Click Load Flash and select HEX file.
-
Click Auto to program, verify, and complete .
Using with Arduino IDE
To burn bootloader onto Arduino board:
-
Connect USBASP to Arduino ICSP header.
-
In Arduino IDE: Tools → Programmer → USBasp.
-
Select Tools → Burn Bootloader .
180° Cable Selection & Configuration
The included 180° straight cable is specifically designed for:
-
Standard vertical ISP headers on development boards .
-
Direct straight connection without bending constraints.
-
Easy access in tight enclosures where space is limited.
Troubleshooting Tips
-
Target Not Detected:
-
Check physical connection (IDC cable or jumper wires) .
-
Verify target board is powered (by programmer VCC or external source) .
-
For AVR chips, ensure target crystal frequency is at least 4 times the ISP clock speed .
-
avrdude: warning: cannot set sck period:
-
Programming Failed / Target Doesn’t Answer:
-
Try lowering the ISP speed in software settings .
-
Ensure target MCU is not in Power Down mode .
-
Check all connections; error can appear if programmer is completely disconnected from target .
-
Slow Mode for Low-Crystal Targets:
-
Fuse Bit Related Errors:
-
If chip uses internal low-frequency oscillator, enable slow speed mode .
-
Incorrect fuse settings can brick AVR chips; always double-check before writing .
-
Driver Issues on Windows:
Q: What is the difference between USBASP and a standard USB-to-TTL converter?
USBASP is a dedicated programmer that uses ISP (In-System Programming) protocol, supporting specific pins (MOSI, MISO, SCK, RST). A USB-to-TTL converter is used for serial communication (UART), not for direct firmware flashing (except for bootloader-based programming). The USBASP is specifically designed for low-level programming of AVR and 51 chips without requiring a pre-flashed bootloader on the target .
Q: What is the difference between USBASP and USBISP?
The terms USBASP and USBISP are often used interchangeably in the market to refer to the same type of programmer. Both are based on the open-source USBASP project and use the ISP (In-System Programming) protocol. The naming may vary depending on the manufacturer, but functional compatibility is generally the same .
Q: Can this programmer power my target board directly?
Yes. The programmer can provide 5V power to the target board (up to 500mA) via the IDC connector’s VCC pin, thanks to the USB port power and the 500mA resettable fuse . For 3.3V target boards, a voltage jumper option is available on compatible versions .
Q: Which software works with USBASP?
It works with ProgISP 1.72, AVR_Fighter, AVRDUDE (command line), AVR Studio 4/5/6/7, and Arduino IDE .
Q: Does this work with Arduino?
Yes. You can use it to burn the bootloader onto an Arduino board (e.g., burning firmware onto a blank ATmega328P chip). Connect the ISP pins accordingly and use Arduino IDE (with “Programmer: USBasp” selected) or AVRDUDE .
Q: Why can't I install the driver on Windows 10/11?
Windows 10 and later may require you to disable Driver Signature Enforcement or use specific driver tools (like Zadig) to install the USBASP driver. The chip is typically recognized as ‘libusb-win32’ .
Q: The program writes successfully but the MCU doesn't run.
For AVR chips, you may need to correctly set the Fuse Bits (e.g., selecting the correct clock source). Accidentally setting fuses to “External Clock” without a crystal will cause the chip to appear dead. For 51 series chips, this is usually not required .
Q: What should I do when I get "target doesn't answer" error?
This usually indicates a connection issue. Check the physical wiring (especially GND), ensure the target is powered, and verify that the ISP speed is appropriate for your target’s clock frequency . For low-frequency targets, use Slow Speed mode (Dip Switch #3 ON) .
Q: Why does the programmer need slow speed mode?
Some target boards use low-frequency crystals (e.g., 32.768kHz) or internal oscillators. USBASP needs to run at a slower speed to maintain reliable communication with these low-frequency targets .
Q: What is the lifespan of the programmer?
The hardware is durable. The 500mA resettable fuse protects the device from accidental short circuits, and the ATmega8A chip is robust against ESD events typical in development environments . The programmer can last for many years under normal use.
Q: Can I use it with STM32 microcontrollers?
No. STM32 boards usually use SWD or JTAG protocols, not ISP. Use an ST-Link adapter for those . However, some STM32 devices support UART bootloader programming, which could potentially be used with a USB-to-TTL adapter, but not directly with USBASP.
Q: Is the 3.3V output supported for low-voltage chips?
Yes. On compatible USBASP versions, you can select the target voltage (3.3V or 5V) via a jumper cap on the programmer board .
Q: What are the main applications of USBASP?
Popular applications include:
-
Embedded development: Programming AVR and 51 series microcontrollers
-
Arduino bootloader burning: Programming blank ATmega328P chips for Arduino boards
-
Firmware upgrades: Field upgrades for embedded products
-
Educational projects: Widely used in electronics labs and DIY projects
-
Product development: Rapid prototyping and iterative programming