Product Description
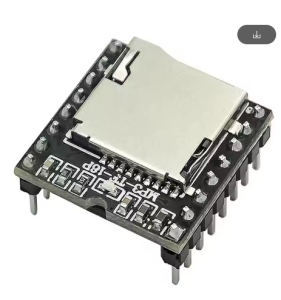
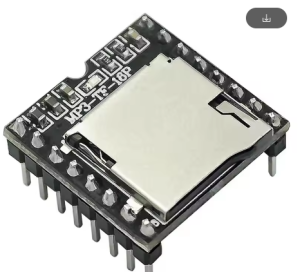
The JL V3.0 Chip-Enabled Mini MP3 Player Module is an ultra-compact, powerful solution designed to add high-quality audio playback capabilities to a wide range of DIY and embedded electronic projects. Utilizing the advanced JL (JieLi) V3.0 series audio decoder chip, this small board can decode common audio formats like MP3 and WAV.
This module simplifies audio integration by supporting multiple input methods, typically including direct audio file playback from a micro-SD card or via a USB connection (as a card reader or even a basic sound card in some configurations). It is designed to be highly versatile and easy to interface with microcontrollers like Arduino, via simple serial commands (UART), or used as a standalone module with onboard buttons or connection points for external buttons for control (play/pause, next, volume). Operating usually from a single 3.7V to 5V DC supply, it is energy-efficient and suitable for battery-powered portable projects. This mini MP3 player offers a cost-effective yet feature-rich way to bring digital music and sound effects to your creations without needing complex audio processing in your main control system.
Features
- Integrated JL V3.0 Decoder Chip: Utilizes an efficient JieLi V3.0 series audio main control chip for high-quality audio decoding.
- Multiple Playback Inputs: Supports direct playback of audio files from a micro-SD card.
- Format Compatibility: Decodes standard audio formats including MP3 and WAV.
- Control Interface Options: Can be controlled via simple UART serial commands using a microcontroller (e.g., Arduino, Raspberry Pi) or via integrated/external buttons for standalone operation.
- Ultra-Compact Size: Small dimensions ideal for portable, space-constrained, and embedded projects.
- Low Power Consumption: Operates typically from a single 3.7V to 5V DC supply, suitable for battery operation.
- Integrated Audio Output: Features options for direct speaker output (usually low power mono) and/or a 3.5mm stereo headphone jack/line out pins.
- Versatile Usage: Perfect for voice prompts, background music players, alarm systems, and custom audio devices.
Usage
This module can be used in two primary modes: standalone (controlled by buttons) or controlled by a microcontroller via serial communication.
Standalone/Button Usage
Connect external buttons (if the board requires them) or use onboard buttons to control playback:
- Power: Apply 3.7V-5V DC power to the VCC and GND pins (often a micro-USB port is available for power/programming).
- Load Audio: Insert a micro-SD card containing MP3/WAV files into the card slot.
- Playback: The module will typically start playing automatically or await button press commands for Play/Pause, Next Track, Previous Track, and Volume Up/Down.
- Audio Out: Connect a small speaker to the SPK pins or headphones to the audio jack.
Microcontroller (UART) Usage
- Connections: Connect VCC and GND. Connect the module’s RX pin to the microcontroller’s TX pin, and the module’s TX pin to the microcontroller’s RX pin.
- Programming: Use your microcontroller’s serial library to send specific commands to the module (e.g., commands to play a specific track number, set volume, loop, etc.).
Application Scenarios
- Talking Toys & Robotics: Adding custom voice lines and sound effects to interactive projects.
- Alarm/Notification Systems: Playing specific warning sounds or music cues based on sensor input.
- Custom MP3 Players: Building unique, portable music players with custom interfaces.
- Museum Exhibits: Providing automated audio descriptions when a visitor approaches a display.
Q: Can I use this module to record audio?
No, this module is strictly a playback/decoder module. It cannot record audio.
Q: Does it have an onboard amplifier?
It typically has a very basic, low-power mono amplifier (often around 1W or 2W) sufficient for driving a small speaker directly. For louder or stereo audio, you will need to use the line-out pins with an external power amplifier board (such as those mentioned previously).
Q: What is the maximum size of the micro-SD card I can use?
Most versions of this specific module support up to 32GB micro-SD cards, formatted as FAT16 or FAT32.
Q: How do I load the music files onto the SD card?
Simply remove the micro-SD card from the module, insert it into a computer using a card reader, and drag/drop your MP3 or WAV files into the root directory of the card. File naming conventions might be required for specific track ordering or UART control (e.g., naming files 001.mp3, 002.mp3).
Q: Can I use this with a Raspberry Pi?
Yes, you can interface with the module via the Raspberry Pi’s GPIO UART pins using Python or other programming languages to send control commands.