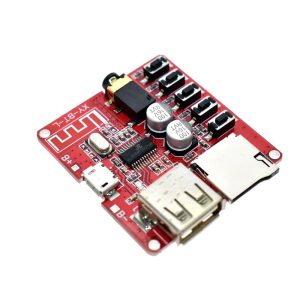
Product Overview
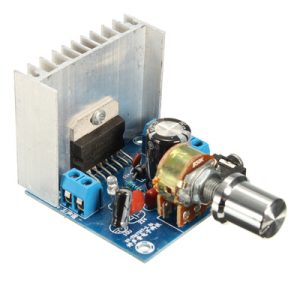
The Premium PWM DC Motor Controller (V2.1) is a specialized, high-performance single-channel motor speed regulator designed for precise 12V DC motor control. Unlike dual H-Bridge modules that handle direction and speed, this enhanced driver board focuses exclusively on delivering smooth, efficient, and adjustable speed control for applications where simple on/off and variable speed are required .
This V2.1 version features an enhanced drive board design with upgraded components, improved thermal management, and a dedicated heat sink. It serves as the ideal solution for controlling conveyor belts, cooling fans, DC pumps, small automation equipment, DIY tools, and 12V lighting systems. Simply connect your power source and motor, and use the onboard potentiometer to dial in the exact speed you need—no microcontroller or programming required .
Whether you are a hobbyist building a custom fan controller, a technician retrofitting industrial equipment, or a business integrating speed control into a product line, this controller offers a professional, reliable, and cost-effective solution.
Key Features
-
Dedicated PWM Speed Control: Designed specifically for variable speed control of 12V brushed DC motors. Provides smooth, continuous adjustment from 0% to 100% duty cycle .
-
Enhanced V2.1 Drive Circuit: Features upgraded power components and refined circuit layout for improved efficiency, reduced ripple, and cleaner output compared to basic PWM modules .
-
3A Continuous Current Capacity: Reliably handles motors drawing up to 3A continuously, with a maximum load rating of 90W, suitable for a wide range of 12V devices .
-
Integrated Heat Sink: Includes a dedicated aluminum heat sink on the main power component to efficiently dissipate heat during continuous operation, ensuring long-term reliability .
-
Onboard Precision Potentiometer: Built-in 10KΩ potentiometer (variable resistor) allows for instant, tool-free speed adjustment. The knob provides smooth, linear control across the entire speed range .
-
Wide Frequency Range: Supports PWM frequencies from 1kHz to 10kHz, allowing you to optimize for quiet operation or motor efficiency depending on your application .
-
Independent Power Design: Control circuit and power circuit are independently designed for enhanced stability and to minimize interference with other connected devices .
-
LED Operation Indicator: Features a power indicator LED that illuminates when the controller is receiving power, providing clear operational status at a glance .
-
Screw Terminal Connections: Heavy-duty screw terminals for secure and reliable connections to your power supply and motor, eliminating concerns about loose wires during operation .
-
Compact Form Factor: Small footprint allows for easy mounting inside enclosures or onto chassis rails without taking up excessive space .
Technical Specifications
Pinout & Interface Guide
Power & Motor Terminals
-
Power Input (VCC / GND): Connect your 12V DC power source here. Observe correct polarity. The input range is designed specifically for 12V systems .
-
Motor Output (Motor + / Motor -): Connect your 12V DC motor here. Reversing polarity will reverse the motor’s rotation direction (if desired) .
Control Interface
-
Onboard Potentiometer: The blue trimmer potentiometer (typically a 10KΩ pot) provides manual speed control. Turning clockwise increases motor speed; counter-clockwise decreases speed.
-
Power LED: Illuminates when 12V power is applied to the input terminals, confirming the controller is active.
(Note: This is a dedicated speed controller. It does not have logic-level input pins for microcontroller control. Speed is set manually via the onboard potentiometer.)
Usage Guide
Typical Wiring Diagram
The Premium PWM Controller is designed for simple, tool-free installation.
Step-by-Step Operation
-
Mount the Controller (Optional): Secure the board using the mounting holes if installing in a permanent location.
-
Connect Power: Connect your 12V power supply to the input terminals. Ensure the power supply is rated for at least 3A (or higher than your motor’s maximum current draw).
-
Connect Motor: Connect your 12V DC motor to the output terminals.
-
Initial Adjustment: Turn the potentiometer fully counter-clockwise to set the speed to minimum (0% duty cycle).
-
Apply Power: Turn on your 12V power supply. The LED should illuminate.
-
Adjust Speed: Slowly turn the potentiometer clockwise. The motor will begin to spin and increase in speed as you turn. Adjust until you reach the desired speed.
-
Fine-Tuning: If the motor hums or runs roughly at low speeds, the PWM frequency can be adjusted (see Advanced Usage below).
Advanced Usage: Frequency Selection
The V2.1 controller typically includes a method to adjust the PWM frequency, often via a jumper or a small switch (depending on the specific variant). This allows you to optimize performance:
-
Low Frequency (1kHz – 4kHz): May provide higher torque at low speeds but can produce audible whine from the motor.
-
High Frequency (8kHz – 10kHz): Operates above the range of human hearing for quieter operation, but may slightly reduce low-speed torque.
Select the frequency that best balances noise and performance for your specific application .
Important Usage Notes
-
Voltage Compliance: This controller is designed specifically for 12V systems. Do not connect to 24V or higher power supplies, as this will permanently damage the module .
-
Current Limits: Ensure your motor does not draw more than 3A continuously. Operating above 3A can overheat the controller and cause failure, even with the heat sink .
-
Wiring Gauge: Use appropriate wire gauge (at least 22 AWG, preferably 18-20 AWG for high-current runs) to minimize voltage drop and heating .
-
Heat Sink Contact: Ensure the heat sink has adequate airflow around it. Do not encase the controller in non-ventilated materials without considering thermal management .
Q: What is the difference between this "Premium" controller and a standard L298N module?
They serve different purposes.
-
This Controller: A dedicated single-channel speed controller. It provides variable speed (PWM) for one motor, controlled by a manual knob. It does not provide direction control or require programming.
-
L298N Module: A dual H-Bridge driver. It can control both speed (via PWM from a microcontroller) AND direction for two motors, but requires a separate controller (like an Arduino) to function.
Q: What types of motors can I use with this controller?
This controller is designed for 12V brushed DC motors. It is also suitable for other 12V resistive or inductive loads like:
It is not suitable for brushless DC motors (BLDC), stepper motors, or AC motors.
Q: Can I use this controller to change the direction of my motor?
No, this controller provides speed control only. It does not have an H-Bridge for reversing polarity. To change motor direction, you must either:
-
Swap the motor wires at the terminals (while power is off), or
-
Use a separate DPDT switch or relay before the controller.
Q: Can I control the speed with a microcontroller instead of the knob?
This specific version (with onboard potentiometer) is designed for manual adjustment only. The speed is set by the physical position of the knob. It does not have input pins for external PWM signals from an Arduino or ESP32.
Q: My motor is rated for 12V but draws 5A. Can I use this controller?
No. The controller is rated for a maximum continuous current of 3A . A motor drawing 5A will exceed this rating and will likely damage the controller, potentially causing fire or component failure.
Q: Can I use a 24V motor with this controller if I only run it at half speed?
Absolutely not. The controller is designed for a 12V supply voltage only . Applying 24V, even with the speed knob turned down, will apply the full 24V to the input circuitry and destroy the module instantly .
Q: What power supply should I use?
Use a regulated 12V DC power supply rated for at least 3A (or 20-30% higher than your motor’s maximum current draw). For example, if your motor draws 2.5A, use a 12V 3A or 4A power supply to provide headroom for startup current.
Q: The motor runs slowly even at the maximum setting. What's wrong?
This usually indicates a voltage drop:
-
Weak Power Supply: Your power supply may not be able to deliver enough current, causing the voltage to sag under load.
-
Thin Wires: The connecting wires may be too thin, causing voltage drop. Use thicker wires for power runs.
-
Distance: If the power supply is far from the controller, voltage drop increases. Keep wires short and thick.
Q: The motor makes a humming or whining noise at low speeds. Is this normal?
Yes, this is normal for PWM controllers. The audible noise is the sound of the motor coils vibrating at the PWM frequency. If this is objectionable:
-
Try switching to a higher PWM frequency (if your version has a frequency selector) to move the noise above the audible range .
-
Add a small ceramic capacitor (0.1µF) across the motor terminals to smooth the pulses.
Q: The controller gets warm during use. Is this normal?
Yes, some warmth is normal. The controller includes a heat sink specifically for this purpose. At full 3A load, the heat sink will become warm to the touch. However, if it becomes hot enough to burn your finger, you are likely drawing too much current or there is inadequate ventilation. Reduce the load or improve airflow.
Q: The motor runs when the knob is turned fully counter-clockwise. Is it broken?
Possibly not. The potentiometer may have a “minimum” setting that isn’t exactly 0%. Alternatively, the controller may have a minimum duty cycle required to start the motor. Check if the motor completely stops when the knob is at the very end of its travel. If not, you may need to add an external on/off switch in series with the motor to ensure a complete stop.
Q: Can I use this to dim 12V LED strips?
With caution. This is a PWM controller, which is an excellent method for dimming LEDs (better than variable voltage). However, you must ensure:
-
The total wattage of the LED strip does not exceed 90W .
-
The current draw of the LEDs does not exceed 3A .
-
You are dimming single-color (non-addressable) LED strips. This will not work with RGB or addressable LEDs.
.jpg)