Product Overview
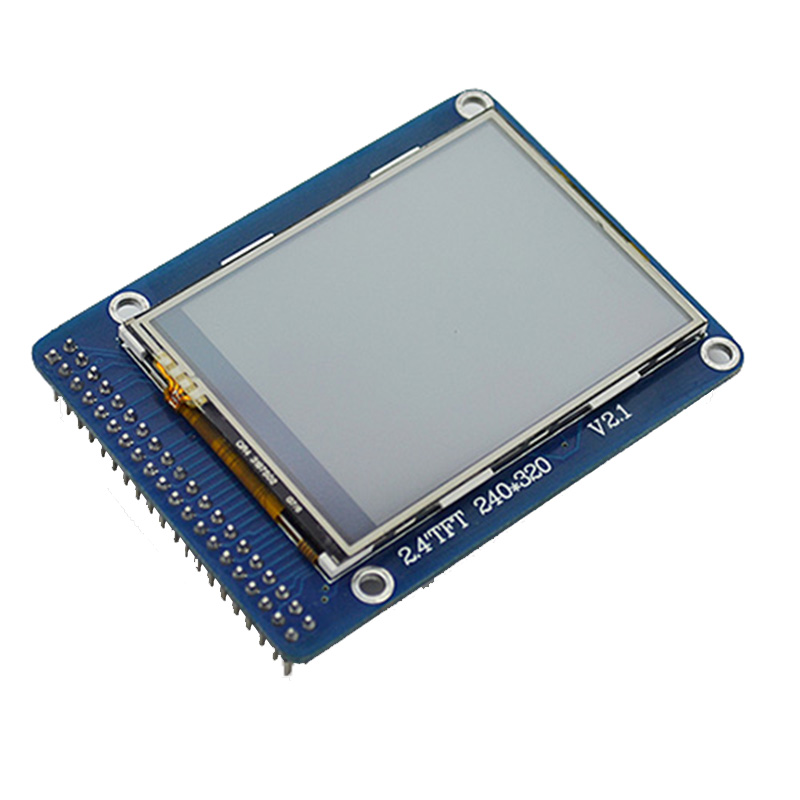
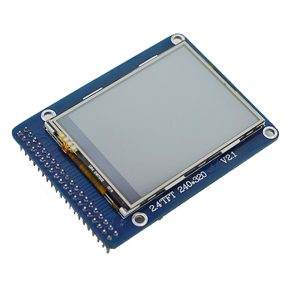
The 2.4-inch TFT LCD Touch Screen Shield is a plug-and-play display module designed to add colorful graphics and touch interaction to your Arduino projects. This shield fits directly onto Arduino Uno, Mega 2560, and compatible boards, creating a complete human-machine interface without any soldering or complex wiring .
With a resolution of 240×320 pixels and support for 18-bit color (262,000 shades) , this display brings vibrant graphical user interfaces to embedded projects. Whether you are building a weather station, a control panel, an oscilloscope, or a retro gaming device, this shield provides the visual feedback and touch input needed for professional-looking projects .
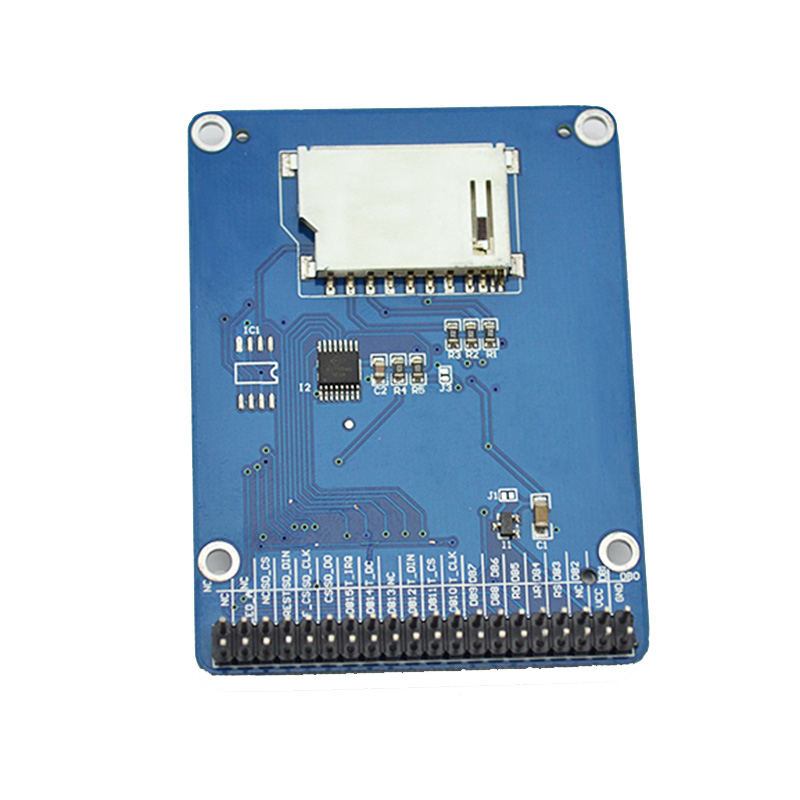
The shield is compatible with two common driver ICs—ILI9341 and ILI9325—and uses the XPT2046 resistive touch controller. An onboard MicroSD card slot allows you to load images, fonts, and data from a standard memory card, extending the display’s capabilities for data logging and photo viewing applications .
Key Features
-
Plug-and-Play Shield Design: Directly stacks onto Arduino Uno, Mega 2560, and compatible boards – no soldering or wiring required
-
2.4-Inch TFT Display: 240×320 pixel resolution with 18-bit (262,000) color depth for vibrant graphics
-
Resistive Touchscreen: 4-wire resistive touch panel with XPT2046 controller; includes stylus pen for precise input
-
Built-in MicroSD Card Slot: Onboard memory card slot for storing images, fonts, and data – expands storage for your projects
-
Wide Voltage Compatibility: 5V compatible with onboard 3.3V regulator; works with both 3.3V and 5V logic systems
-
SPI Communication: Uses hardware SPI for fast data transfer, sharing the bus between the display, touch controller, and SD card
-
Compatible with Multiple Libraries: Works with Adafruit_TFTLCD, MCUFRIEND_kbv, UTFT, and TFT_eSPI libraries
-
Available I/O Pins: After installing the shield, pins 2, 3, A4, and A5 remain available for additional sensors and peripherals
-
Onboard Backlight Control: 4 white LEDs with brightness control via PWM pin
Technical Specifications
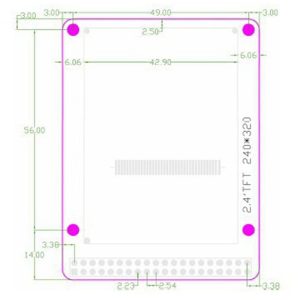
Pinout & Interface Guide
The shield is designed to stack directly onto your Arduino. The following pins are used by the display, touch, and SD card functions:
Display Interface (8-bit Parallel)
Touch Interface (SPI)
SD Card Interface (SPI)
Important Pin Notes:
-
The touch controller and SD card share the same SPI bus (SCK, MOSI, MISO) but use separate Chip Select pins
-
After mounting the shield, pins D2, D3, A4, and A5 remain free for your own sensors and peripherals
Usage Guide
Hardware Setup
-
Mount the Shield: Carefully align the shield’s pin headers with your Arduino Uno’s female headers. Press down firmly and evenly until fully seated .
-
Avoid USB Port Contact: The shield may overhang the USB port area. Place electrical tape on the USB connector to prevent accidental contact with the shield’s bottom .
-
Insert MicroSD Card (Optional): For image storage or data logging, insert a FAT16/FAT32 formatted MicroSD card into the onboard slot.
-
Power the Board: Connect your Arduino to your computer via USB or an external 5V power supply. The shield draws power from the Arduino’s 5V pin.
Software Setup (Arduino IDE)
1. Install Required Libraries
You need three libraries – one for the display, one for graphics, and one for the touch controller.
Method A: Using Library Manager (Recommended)
Open Arduino IDE → Sketch → Include Library → Manage Libraries . Search for and install:
-
Adafruit GFX Library – Core graphics library
-
Adafruit TFTLCD Library – Hardware-specific library
-
XPT2046_Touchscreen by Paul Stoffregen – Touch controller library
Method B: Using MCUFRIEND_kbv Library (for unknown controllers)
If your shield has an unknown driver or readID() returns 0x0000, use the MCUFRIEND_kbv library instead. This library automatically detects many controller types and works with most 2.4-inch shields .
2. Identify Your Display Controller
Upload the graphictest example from the Adafruit_TFTLCD library and open the Serial Monitor .
The sketch will print the driver ID:
-
0x9341 = ILI9341
-
0x9325 = ILI9325
-
0x5408 = SPFD5408
If readID() returns 0x0000, your shield may use a different pin mapping. Try using the MCUFRIEND_kbv library instead .
3. Basic Test Sketch
#include <Adafruit_GFX.h>
#include <Adafruit_TFTLCD.h>
#define LCD_CS A3
#define LCD_CD A2
#define LCD_WR A1
#define LCD_RD A0
#define LCD_RST A4
Adafruit_TFTLCD tft(LCD_CS, LCD_CD, LCD_WR, LCD_RD, LCD_RST);
void setup() {
Serial.begin(9600);
tft.reset();
uint16_t identifier = tft.readID();
tft.begin(identifier);
tft.fillScreen(ILI9341_BLACK);
tft.setRotation(1);
tft.setTextColor(ILI9341_WHITE);
tft.setTextSize(2);
tft.setCursor(30, 140);
tft.print("Hello World!");
}
void loop() {}
Calibrating the Touchscreen
Resistive touch screens require calibration to map raw ADC values to screen coordinates .
-
Upload the tftpaint example from the Adafruit_TFTLCD library
-
Touch the corners of the screen as prompted
-
Record the raw values (range is typically 150-900)
-
Update the calibration values in your code:
#define TS_MINX 150
#define TS_MINY 120
#define TS_MAXX 900
#define TS_MAXY 880
int x = map(raw_x, TS_MINX, TS_MAXX, 0, tft.width());
int y = map(raw_y, TS_MINY, TS_MAXY, 0, tft.height());
Troubleshooting Touch Calibration:
-
If an axis is inverted, swap min and max values for that axis
-
If X and Y are swapped, exchange the map() parameters
-
If calibration fails completely, your shield may use different touch pins. Try modifying the pin definitions in the library or use the MCUFRIEND_kbv library which handles multiple pin configurations .
Q: What Arduino boards are compatible with this shield?
The shield is designed for Arduino Uno R3, Leonardo, and Mega 2560 . For Mega boards, the shield aligns with the first 14 digital pins and first 6 analog pins. Check your specific shield’s documentation for Mega pin mapping.
Q: What is the difference between ILI9341 and ILI9325 drivers?
Both are 240×320 TFT controllers. The ILI9341 is newer, supports SPI (faster displays), and has better library support. The ILI9325 is an older controller that primarily uses parallel interface. Most libraries (Adafruit, MCUFRIEND) support both automatically.
Q: Can I use the shield with a 3.3V board like ESP32 or STM32?
The shield requires 5V power but has an onboard 3.3V regulator for logic . For 3.3V boards, you need to connect the shield’s 5V pin to an external 5V supply and connect the logic pins to your 3.3V board with proper level shifting for the data bus.
Q: How many I/O pins remain free after mounting the shield?
Pins D2, D3, A4 (SDA), and A5 (SCL) remain available for additional sensors . Pin D12 is also free if you are not using the MicroSD card. The Mega’s additional pins remain fully accessible.
Q: I mounted the shield, but nothing displays – only a white screen!
This is the most common issue . Try these solutions:
-
Check that the shield is fully seated and making good contact
-
Upload the graphictest example – it will identify your controller automatically
-
If readID() returns 0x0000, use the MCUFRIEND_kbv library instead
-
Try adjusting tft.begin(identifier) to tft.begin(0x9341) for ILI9341 or tft.begin(0x9325) for ILI9325
Q: The touch screen is not responding or coordinates are inverted
Calibration issues are common with resistive touchscreens :
-
Check that the touch pins (YP, XM, YM, XP) are correctly defined in your library
-
Run a calibration sketch to get the raw ADC values for your specific shield
-
If axes are swapped, exchange the map() calls for X and Y in your code
-
If an axis is inverted, swap the TS_MIN and TS_MAX values for that axis
Q: The SD card works but the display doesn't (or vice versa)
The touch controller and SD card share the SPI bus. Ensure each device has a unique Chip Select (CS) pin and that your code de-asserts (sets HIGH) the other device’s CS before communicating .
Q: What can I build with this 2.4-inch TFT shield?
Popular projects include:
-
Data Loggers: Display sensor readings graphically with SD card storage
-
Oscilloscope: Build a 2-channel oscilloscope with real-time waveform display
-
Photo Frame: View BMP images from the SD card with touch navigation
-
Control Panels: Touch-based UI for home automation, robotics, or CNC machines
-
Handheld Games: Retro gaming devices and interactive toys
-
Diagnostic Tools: Battery testers, multimeters, and instrument displays
Q: How do I display images from the SD card?
Use the Adafruit_ImageReader library or the BMP drawing function from the SPFD5408/UTFT libraries . Image files must be 24-bit BMP format and placed in the root directory of a FAT16/FAT32 formatted SD card.
Q: Is this shield suitable for battery-powered projects?
The TFT backlight draws significant current (up to 120mA) . For battery-powered applications, you can control the backlight brightness via PWM or turn it off when not in use. The shield’s power consumption is approximately 100-150mA with backlight on.
Q: Can I use this shield with Arduino Nano or Pro Mini?
Not directly as a shield – these boards lack the standard female header layout . You can wire the display manually using jumper cables with a standalone TFT module that has pin headers rather than shield connectors.
Q: What libraries are recommended for this shield?
For most users, start with:
-
Adafruit_TFTLCD + Adafruit_GFX – Easy to use, well-documented
-
MCUFRIEND_kbv – Best for generic or unknown shields, auto-detects controller
-
UTFT – For older ILI9325 shields with parallel interface
-
XPT2046_Touchscreen – For resistive touch support